
5 entries
Removal
Below 100: coarse removal
What it changes
A coarse starting range for substantial removal or shaping.
Use only when the amount of material to remove justifies deep scratches. A fine-looking coating over those scratches will not hide them.
Before you proceed
Check what the existing coating is before disturbing it. This table does not identify old coatings or establish a suitable removal method.
Bare wood
100–120: medium preparation
What it changes
An intermediate range for leveling bare wood and reducing marks from a coarser abrasive.
Choose the least aggressive starting grade that addresses the actual defect. Inspect the surface between stages rather than jumping to the final number.
Before you proceed
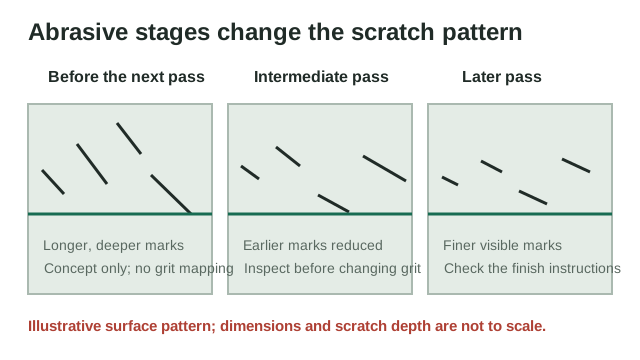
Keep the same grading system through a trial sequence. Remove the previous scratch pattern before moving finer.
Bare wood
Final bare-wood stage: check the finish
What it changes
A finer preparation stage for surfaces already leveled.
Test the planned stain or finish on an offcut prepared the same way. A smoother surface is not automatically the preferred surface for every finish.
Before you proceed
Use the finish maker’s final-grit instruction. Do not assume this range is the endpoint for every wood species or coating.
Finish preparation
220: fine finishing work
What it changes
A fine grade often encountered in finishing schedules.
The number alone does not tell you whether to use it on bare wood, a primer or a cured film. Read the schedule for the exact surface being sanded.
Before you proceed
Confirm that the existing layer is ready for abrasion and that sanding will not cut through a thin color or clear layer.
Between coats
Between coats: use the specified grade
What it changes
Fine abrasives appear in some between-coat and final-smoothing operations.
The task may be removing small raised defects rather than leveling the whole coating. Sanding every coat is not an automatic requirement.
Before you proceed
Check the product’s recoat window and preparation instructions. Do not use a generic grit table to override them.
No entries match. Clear the filters or try a broader phrase.
Choose an abrasive for the surface in front of you and the next operation in the finish schedule. A grit number does not, by itself, specify how much material to remove or prove that a surface is ready for stain, paint, resin, or another coat.
The lookup above summarizes common sanding-stage examples from wood-finish guidance. Use the exact product label when it gives a final grit or between-coat preparation. This page does not convert between grit standards or prescribe one sequence for every wood species and finish.
Select the stage from the surface condition
Begin by identifying what you are sanding: bare wood, an existing finish, or a coating that has reached its stated recoat stage. Then identify the job: remove a defect, level a prepared surface, or reduce a small raised mark. These are different operations even when the same abrasive number appears in two instructions.
A coarse abrasive can remove material quickly but leaves deeper scratches to remove later. A finer abrasive removes less material per pass. Moving finer before the earlier scratch pattern is gone can leave visible marks under stain or a clear finish. Inspect the surface in consistent light rather than assuming that a higher number guarantees a better result.
| Surface and task | What the lookup can tell you | What still controls the choice |
|---|---|---|
| Bare wood with a visible defect | A coarser or medium stage may be needed to remove the defect and earlier scratches. | Wood species, defect depth, finish instructions, and a prepared test piece. |
| Leveled bare wood before stain | A finer stage may reduce the scratch pattern. | The stain maker’s stated final grit and the sample’s color absorption. |
| Cured finish between coats | A fine abrasive may be used for a stated surface-preparation step. | The product’s cure/recoat instructions and whether sanding is required. |
| Clear resin polishing | This wood-finishing lookup does not provide a resin polishing sequence. | The exact resin and polishing-system instructions. |
Read the grit designation, not just the number
A “P” prefix identifies a FEPA P-grade on a coated abrasive. An unprefixed number may follow a different system, such as CAMI. Similar-looking numbers are not a promise of exact equivalence. Keep the printed designation, abrasive type, and intended stage together in your notes.
The 100/120 and 220 descriptions in the lookup are examples of stages used in a manufacturer’s wood-preparation guidance. They are not universal endpoints. If a product calls for a particular grit, use an abrasive whose grade system and number match that instruction rather than estimating a conversion.
Test the full preparation on a sample
Use an offcut of the same wood when possible. Sand it with the intended abrasive designation and the same technique planned for the project. Remove dust using a method allowed by the finish maker, apply the intended finish, and check the result after the stated drying or cure period.
A sample can reveal scratches, uneven stain absorption, or marks left by the tool. It cannot establish that a different board, old coating, or wood species will behave identically. Do not use a generic grit table to identify an unknown coating or choose a removal method for a potentially hazardous finish.
- Record the surface and finish product.
- Write the exact grit designation, including any prefix, and the abrasive type.
- Sand a representative sample; inspect before moving to a finer stage.
- Apply the intended finish and compare only after the product’s stated interval.
Worked example
A bare-wood sample with a specified 220 final stage
Assumptions
- The example is a hypothetical project whose selected finish instructions specify 220-grit final sanding.
- The sample has already been leveled; no deep defect remains.
Inputs or observations
- Surface: bare wood offcut from the project.
- Next step: apply the selected stain after final sanding.
- Documented final designation: 220 grit; the label does not state a P prefix.
Calculation or decision path
- Use the stated 220 designation for the final sample preparation.
- Do not substitute P220 on the assumption that unprefixed 220 and P220 are identical.
- Apply the stain to the sample and inspect it before preparing the whole project.
Result: The sample follows the stated final-grit instruction. Whether it produces the desired color and appearance is decided by the finished sample, not by the number alone.
Common questions
- Does a higher grit number always produce a better finish?
- No. The useful grade depends on the surface, the defect being removed, the abrasive system, and the finish maker’s instructions.
- Can I use this table to polish cured resin?
- No. Resin polishing compounds and abrasive systems are outside this wood-preparation lookup.
Let the finish instructions set the endpoint
Use this reference to understand common sanding stages and ask better questions about a grit label. The selected finish’s current preparation instructions and a representative sample determine the usable endpoint.
- Keep the grading-system prefix with the number.
- Remove the previous scratch pattern before moving finer.
- Do not treat wood-finishing grit examples as a resin-polishing schedule.